Saturday, December 3, 2011

Sweetwater

Our new favorite place to hike is called Sweetwater Preserve. The park named after the Sweetwater Branch of Hogtown Creek that flows into Payne's Prairie. The park itself is nice but it is adjacent to the north part of Payne's Prairie State Park, which is really nice. Its never crowded, easy to get to, and the forest and creek are really nice. We had such warm weather into December - Its been crazy to see snakes out and active in November.
TD found beautiful yellow rat snake under a log

Here it is giving TD a bite!

On the edge of the Prairie with JB and Prairie

Friday, December 2, 2011

Carnitas Gringas

The first thing I made in our new range were these carnitas. This is one of my go to meals and great for dinner parties because most of it can be done ahead (even the day before). I can remember where I got the original recipe, but it involved lots of exotic spices like achiote and mexican oregano and several kinds of peppers. But you can get awesome, authentic flavor with just 4 ingredients - chipotles in adobo (canned), orange juice, garlic and vinegar.

Carnitas
3-5 pound pork roast (picnic, shoulder or boston butt all work great)
2 c Orange Juice
5 cloves garlic, peeled and crushed
2-3 chipotles in adobo - more to taste

Combine marinade ingredients and marinate pork overnight. Add pork and marinade to a lidded, oven safe pot - a dutch oven is great. Bake at 375 for 3-4 hours or until meat is easily pulled apart with a fork. Turn meat every hour and add water if needed - you do not want all liquid to evaporate. If cooking in a slow cooker, cook on low for 8 hours or until meat is easily pulled apart with a fork.

Once meat is cooked, discard fat and shred meat with 2 forks. Add meat with 1/4 cup of cooking liquid and fry until crispy. Serve with warm tortillas and all the fixings - especially cilantro and pickled onions.

Wednesday, November 30, 2011

Our kitchen (part 6)

I am really happy with how our new kitchen looks - I love the white cabinets, butcher block countertops and stainless appliances - but I am really happiest with how much more functional it is.

We had a tiny budget to do this kitchen remodel so we weren't able to move plumbing or electric, and changing the floor plan was out too. Because the ceilings are already so low in here, I wanted to not have upper cabinets if possible. So we had to remodel smarter and try to squeeze in any extra space that we could.

The following really helped us gain space and function.

  • Replace almost all cabinets with drawers - they store more and are easier to get things out of them
  • Move dishwasher against the wall - this way someone can be doing dishes and someone can be working at the counter at the same time
  • Move the range towards the fridge- this let us increase the span of countertop between the sink and stovetop - this area is prime real estate!
  • Install a deep over the fridge cabinet - this 24" deep cabinet gives the fridge a built in look as well as a lot of storage space. I store all of the original boxes for our appliances here.
  • Install a tall cabinet on the small wall - Having a single tall cabinet rather than just a base cabinet let us store all kinds of stuff - appliances, microwave, etc. out of sight. Having all of this behind doors reduces visual clutter and makes the kitchen seem larger. The previous design had a countertop here which wasn't that functional because it was so small.
  • Install a countertop over the laundry machines - this is normally behind doors, but if needed for a big project - sausage stuffing, rolling out pasta, making a wedding cake - this area can easily be used
And now for the fun part - organization!!
The top three shallow drawers have all the cutlery and tools. Drawer 1: cutlery and serving utensils, 2: knives, cutting and opening tools, 3: stirring and measuring tools

A drawer for glass storage containers - no plastic!

This drawer holds all our everyday dishes - service for 12 - plus 12 extra salad plates and 8 handled soup bowls. I worry about the weight but the drawers seem very sturdy with no sagging and they slide very smoothly.

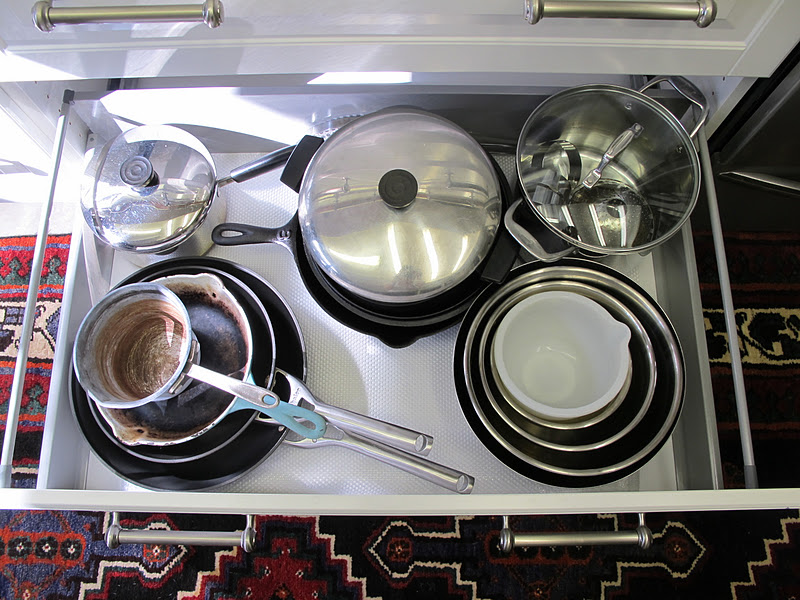
Not sure why this photo is rotated - but the bottom large drawer has all of the pots, pans and bowls. I do have an additional super large stockpot for canning that is in the pantry.


This is one of my favorite features - a narrow pullout cabinet next to the stove. We modified and attached this rack, so that we could have upright storage for cutting boards, cookie sheets, etc. Its so much easier than digging through layers of pans in the drawer below the oven. There are two shallow drawers above this which have spices & tea and foil, baggies, etc.

The bottom shelf of the tall cabinet holds all of the small appliances - mixer, ice cream maker, coffee maker, slow cooker, and food processor. For less than $30 this food processor is great!

There is a plug in the back of the cabinet, so we have the microwave and coffee grinder in here. Shelf liner makes wiping up any spills easy.

All of our china and barware fit in the top shelf of the tall cabinet. We have all of our everyday glassware and coffee mugs on the next shelf below. (Crystal is in the living room in another cabinet.) 

Can't believe I am showing my garbage cans, but here they are! The sink cabinet is just 24 inches wide, so there isn't a ton of space. The left side has a pullout with a small trash can (1 gallon), and a recycling bin (4 gallon). The right side has another recycling bin (for plastic and glass) and the compost container. In the middle we have room for dishwasher detergent and all purpose cleaner.

This set up might not work for many households but it works great for us. We empty all the containers 2 or 3 times a week. This keeps the garbage from getting stinky and because we just produce 2 small bags a week our tiny garbage can is working fine for us.

The laundry area stores dog stuff - food, toys, treats, meds, as well as other miscellany like lightbulbs and flashlights.

The rolling cart between the machines stores all the cleaning supplies that would normally be under the sink. 

View from the front door - laundry is on the right, pantry on the left.

Monday, November 28, 2011

Our kitchen (part 5)

Part 5 had to wait several weeks because when we got ready to install the last cabinet - this giant one - we found it broken in about 6 places. Seriously - how does that happen?

After several calls to ikea and several days of waiting, we had a replacement scheduled to be delivered in 2 weeks. Not great, but not too bad considering we live 100 miles from Ikea and the cabinet weighs about 150 lbs and is 7 feet long, so returning it wasn't really an option.

But this last cabinet was pretty easy to install. We used these toggle bolts and they were pretty easy to use and seemed to go in securely. And now we are so happy with our new kitchen!


This area is our new "landing strip" for keys, wallets and phones.

We are so happy with how everything turned out. We still have a few things to do: cut new kick panel for the tall cabinet (its too tall for the stock molding), apply trim around the fridge panel and cabinet, caulk in a few places but we are so happy with how it turned out (and we are so happy to be done!!).

I'll post some of the interior organization in my next (and last) post - to me that's the best part!

Saturday, November 26, 2011

Our kitchen (part 4)

On day 5 we were able to start putting in cabinets - woo hoo!!!
We moved the dishwasher to the other side of the sink and also selected a different size sink cabinet, so I was REALLY worried that the water valves were going to be in exactly the wrong place. We did have to cut a hole in the side wall for the valve handle to go through, but we would have had to cut a hole any way for the water supply and drain for the DW so that was fine.

The vent hood is a little high - we will probably lower it (someday).

I leveled and anchored all the cabinets myself. TD cut the countertops - very easy to do with the circular saw - and we installed them together. Installation was very easy - just screw them on! I was really impressed with all of the instructions and hardware that ikea provided. Actually installing the cabinets went FAST!

The sink!! I was so tired of doing dishes in the bathtub, so I was stoked to get the sink in and working. This farmhouse sink (single bowl Domsjo) from Ikea was a great deal - we love the huge single bowl and its very easy to keep clean. We chose this faucet from Overstock. It works great and is very functional. I had never installed a sink before and this was very easy to install.

I wanted to get the sink in so badly, I made a Lowes run about 20 minutes before it closed to get new PVC drain pipes. I had never done anything like that before either but it was easy. We turned the water back on, checked for leaks and we were back in business!


Putting in all the drawers really makes a difference & TD and I were REALLY happy to get all of our dishes off the dining table! 
We used these fintorp handles from Ikea. I was originally going to use cup pulls, but thought that might look too traditional in our kitchen. The scale of these is a little off - they are a bit too big/chunky - but I am generally happy with them.

Friday, November 25, 2011

Our kitchen (part 3)

We were finally able to actually paint on day 4 - the last day my parents were in town. The prep work took a lot longer than I anticipated, but I was impressed that we were able to do it all!
 Pa Frugal Ecologist is an excellent painter!

 You can see the piping handywork from our plumber here. The electrical box on the ceiling is where the range hood will go.

My mom and I did the taping and we were pretty impressed with the outcome - look at this straight line on the ceiling!

While we were painting, Mom hemmed these curtains that had been driving TD nuts since the day we moved in.
Meanwhile Dad introduced the dogs to their new dishwasher box doghouse.


Thursday, November 24, 2011

Thanksgiving for Two!

Happy Turkey Day to everyone! TD and I are thankful to be spending it with each other.

Tuesday, November 22, 2011

Our kitchen (part 2)

All of day 2 was spent patching the dry wall and waiting for it to dry. Because it was so thick in some places, it took 24 hours to dry.
This picture was taken on day 3. We primed the ceiling in white and we used an oil based primer from Benjamin Moore for the walls. We used BM Aura paint, but our paint guy recommended the oil base to get the best coverage over the wall paper that we had removed.

 Since we had to wait overnight for the primer to dry, we were able to catch the tail end of the Cedar Key seafood festival. Most of the booths with seafood were gone, but we did enjoy looking at the crafts and the museum. And we got to eat at Tony's - home of the world's best clam chowder. I don't usually like chowder (too flour-y - give me oyster stew any day) but this was great. We got our fill of fried and steamed seafood and even caught a beautiful sunset over the gulf.


Sunday, November 20, 2011

Our kitchen (part 1)

We have been busy busy with our kitchen and are very happy that it is 99% finished. I love all the organization and even though we don't really have any more space - with all the doors and windows in this room we were pretty maxed out as to where we could put cabinets - its so much more functional and easy to cook in.

We were really lucky to have my parents helping us with the demo. The upper cabinets were one piece of MDF and weighed a TON. We ended up having them come crashing down and thankfully no one was injured!

Sadly, these are the only photos of the kitchen in its full dingy glory. No, the color isn't off - it really was that gross! The first thing we did was to rip off this vinyl wall paper (it smelled!!) and have tile put in.


New appliances are in and old cabinets are ready to come out!!

This was shortly before the big crash - this whole thing ripped out of the wall. Luckily it mostly landed on the ladder and the remaining base cabinet.

The handy-man and handy- woman!

This was the first "surprise". I guess they didn't have enough plaster to finish off this drywall behind the cabinets. Hmm, I guess we will have to do it since we aren't putting in upper cabinets. Oh, and yes, there is a jagged 12 inch hole where the vent was.

Least favorite part - crawling in the attic on my belly (probably shouldn't have worn shorts and sandals) to detach the chimney for the vent.

Second "surprise": virtually impossible to get this cabinet out without cutting the plumbing pipes. Also, one valve was frozen so we had to turn off the water to the whole house. Somehow my dad and TD managed to get it off but we still ended up calling a plumber to replace the valves with shiny new ones. 

Best part of the day: Plumber came in 30 minutes, shortened the drain pipes, capped the second drain that we would no longer be using flush with the wall, replaced the intake valves and only charged $150 (and now we have a great plumber).

Thursday, October 20, 2011

What we've been up to...

Long time no post!

We've both been working hard - TD has been submitting several Professor/Curator job applications, Ma and Pa Frugal Ecologist came to visit, AND.....

We remodeled our kitchen!!! Stay tuned for details - but here's a sneak peek.

Monday, October 3, 2011

Menu Monday

Whats on the plate this week...I've been trying to add some variety back in (TD won't eat a pot of beans all week like your truly) while sticking to a least 2 nights of vegetarian meals a week. For veggies we usually do a big green salad or something steamed like broccoli.

Red Beans and Rice - never made this from scratch before.


Tofu with veggies and peanut sauce

Posole - lots of carnitas left and this will be mostly vegetarian


Tuna Casserole - comfort food! And light on the meat...


BBQ pulled pork sandwiches - again lots of pork left!

King Ranch chicken casserole - request from TD